在cmd下,關掉git自動轉換的功能
git config --global core.autocrlf false

在cmd下,關掉git自動轉換的功能
git config --global core.autocrlf false
最近打開在寫技術報告,寫到一半覺得word弄出來的文件非常難看.
因此興起了用latex寫文件的念頭.
因為已經兩三年沒寫latex,連安裝基本上都沒有了.
稍微搜尋一下安裝方法,又分為MacOS/Windows.
想說太麻煩了!
乾脆用docker來跑latex編譯的工作.
下列就是用docker建立一個latex編譯環境:
1.首先我們需要建立一個image
mkdir -p $PWD/latex_temp/fonts
cat <<EOF > $PWD/latex_temp/Dockerfile
FROM slanla/ubuntu

MAINTAINER slanla [email protected]
RUN DEBIAN_FRONTEND=noninteractive \
    apt-get update && \
    apt-get upgrade -y && \
    apt-get -f install && \
    apt-get install -y \
      fontconfig \
      texlive-xetex \
      texlive-publishers \
      texlive-latex-extra \
      texlive-latex-recommended \
      latex-cjk-* \
      language-pack-zh-hant \
      language-pack-zh-hant-base

COPY fonts /usr/share/fonts
ENV LANG zh_TW.UTF-8
ENV LANGUAGE zh_TW:zh
ENV LC_ALL zh_TW.UTF-8
EOF

docker build -t slanla/latex $PWD/latex_temp/
2.接著之後有需要編譯*.tex文件的話,例如是main.tex,
只需要在main.tex所在目錄下執行下列指令就可以編譯出main.pdf.
docker rm -f latex || echo 1
docker run \
    -d \
    --name latex \
    -v $file_path:/data \
    -w /data \
    slanla/latex \
    xelatex main.tex
docker logs -f latex
這邊可以看到我是用-d,並加上docker logs來查看log,而非用-it –rm.主要避免latex出錯時,整個終端機會無法控制使用的問題.
3.有了步驟2的指令,我們就可以跟Sublime Text來做整合.
(a)首先打開Sublime Text
(b)開啟Tools->Build System->New Build System
(c)輸入下列json資料:
{
  "encoding": "utf8",
  "working_dir": "$file_path",
  "shell_cmd": "(rm -f $file_path/*.aux $file_path/*.bbl $file_path/*.blg $file_path/*.lof $file_path/*.log $file_path/*.toc) && (docker rm -f latex || echo 1 ) && docker run -d --name latex -v $file_path:/data -w /data dkr.tw/latex bash -c 'xelatex $file_base_name;bibtex $file_base_name;xelatex $file_base_name' && docker logs -f latex"
}
如此一來只需要用Sublime Text編輯main.tex後,按下CMD+B就可以編譯成PDF檔案了.
假設cntos ip是172.16.1.1,想要分享的資料夾是/volume1/nfs
只需要用下列指令就可以架設好nfs server
yum install nfs-utils -y
echo "/volume1/nfs 172.16.0.0/16(rw,sync,no_root_squash,no_all_squash)" >> /etc/exports

systemctl enable rpcbind
systemctl enable nfs-server
systemctl enable nfs-lock
systemctl enable nfs-idmap
systemctl start rpcbind
systemctl start nfs-server
systemctl start nfs-lock
systemctl start nfs-idmap
client端部分只需要:
echo "172.16.1.1:/volume1/nfs /nfs nfs rw 0 0" >> /etc/fstab
mkdir -p /nfs
mount -a
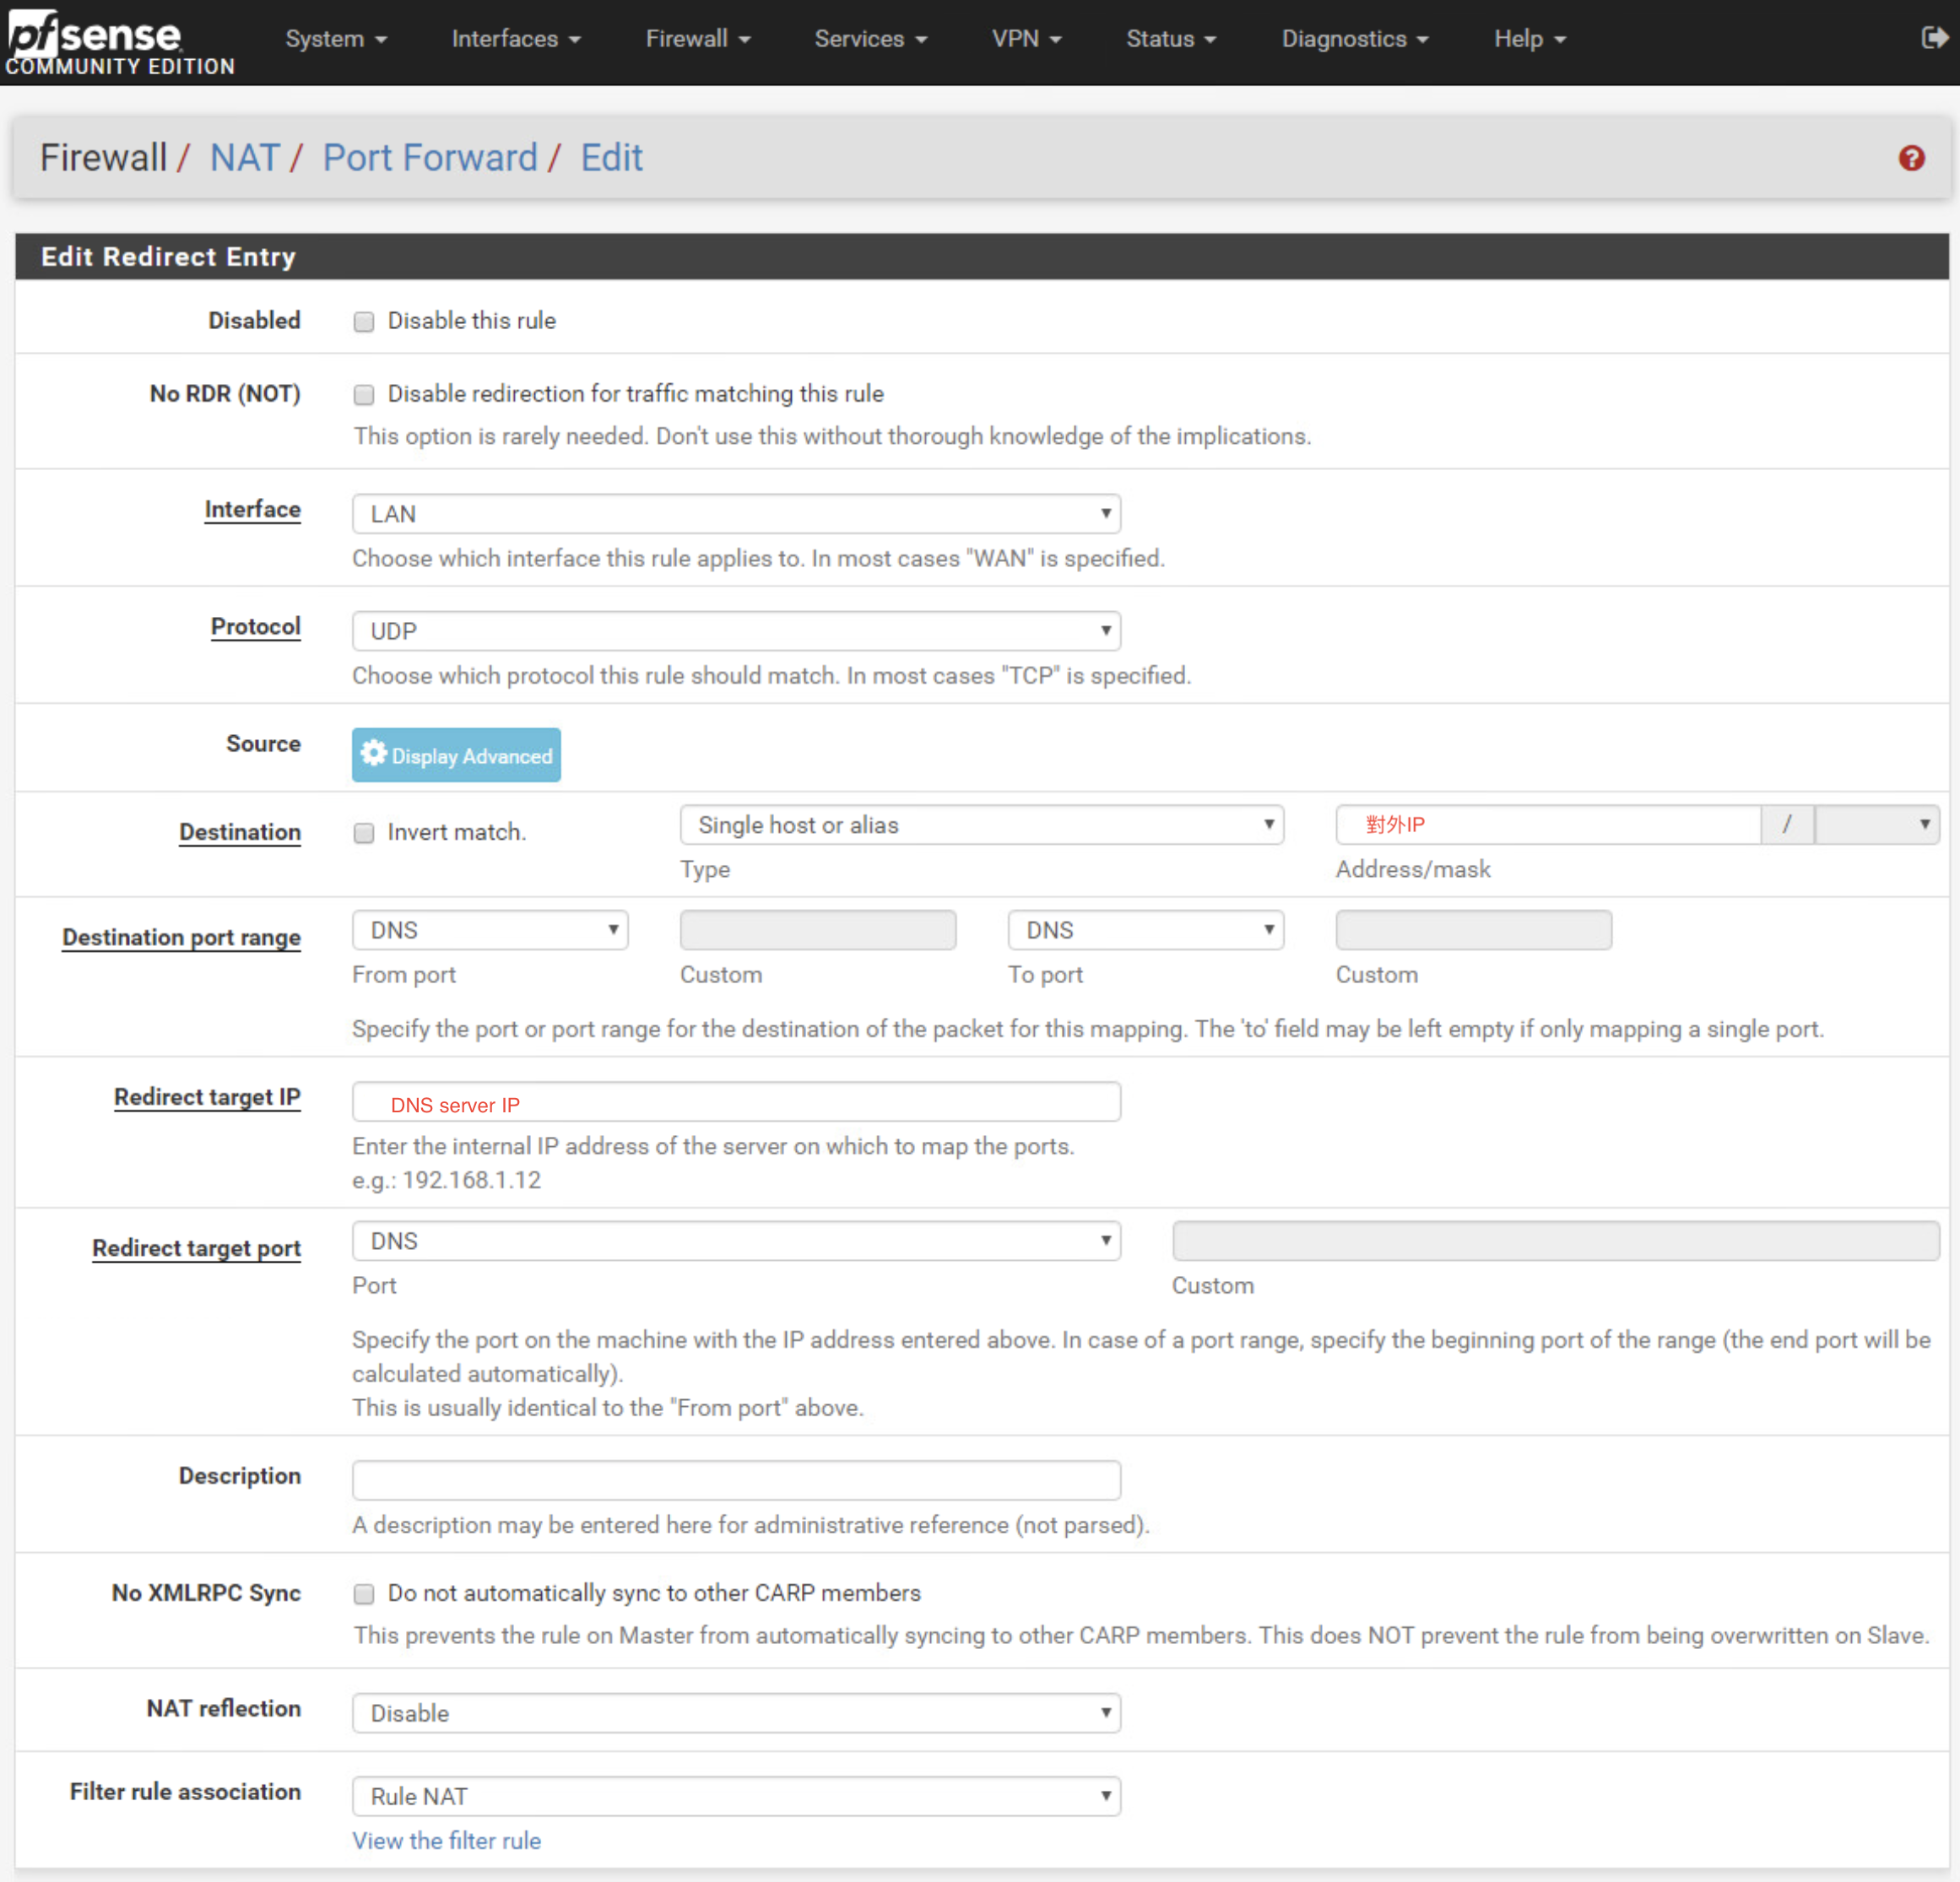
儘管已經做了DNS server的NAT
卻只能從外部IP對DNS server做查詢.
但內網對無法做查詢.
解決辦法是在NAT中,將所有內網連到外部IP的DNS查詢,導向DNS server
refer:
https://www.netgate.com/docs/pfsense/nat/accessing-port-forwards-from-local-networks.html
https://www.netgate.com/docs/pfsense/dns/redirecting-all-dns-requests-to-pfsense.html
利用curl取得對外ip
curl http://ipecho.net/plain ; echo
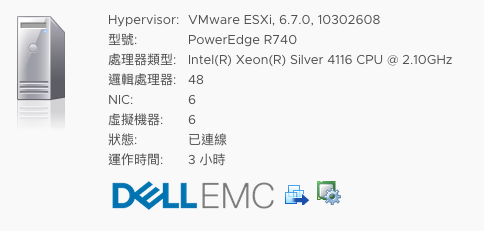
今天在一台Dell R740上面安裝Dell製造的1080Ti
在esxi host上面開啟PCI透通後,重開機
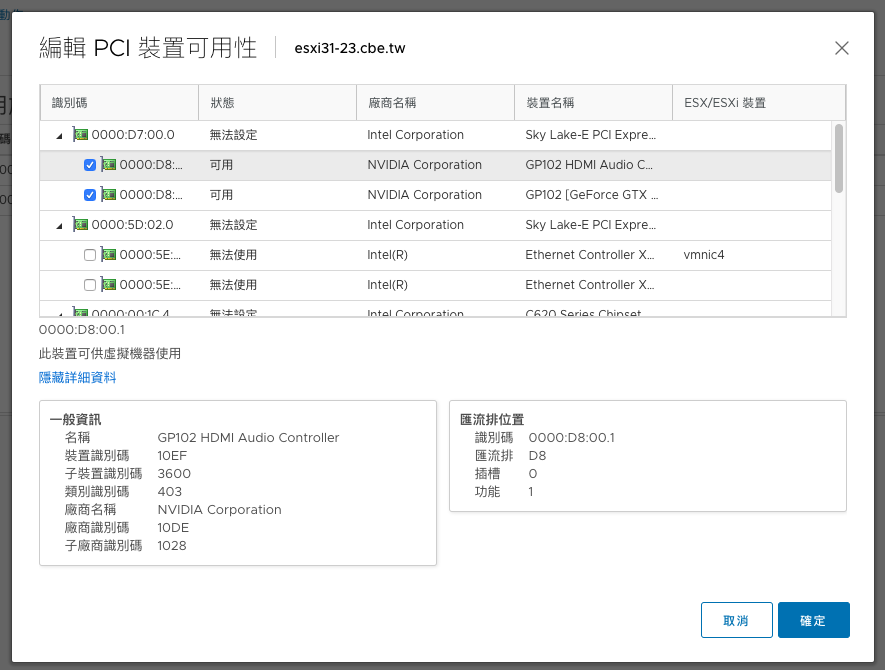
接著在虛擬機上面新增PCI裝置
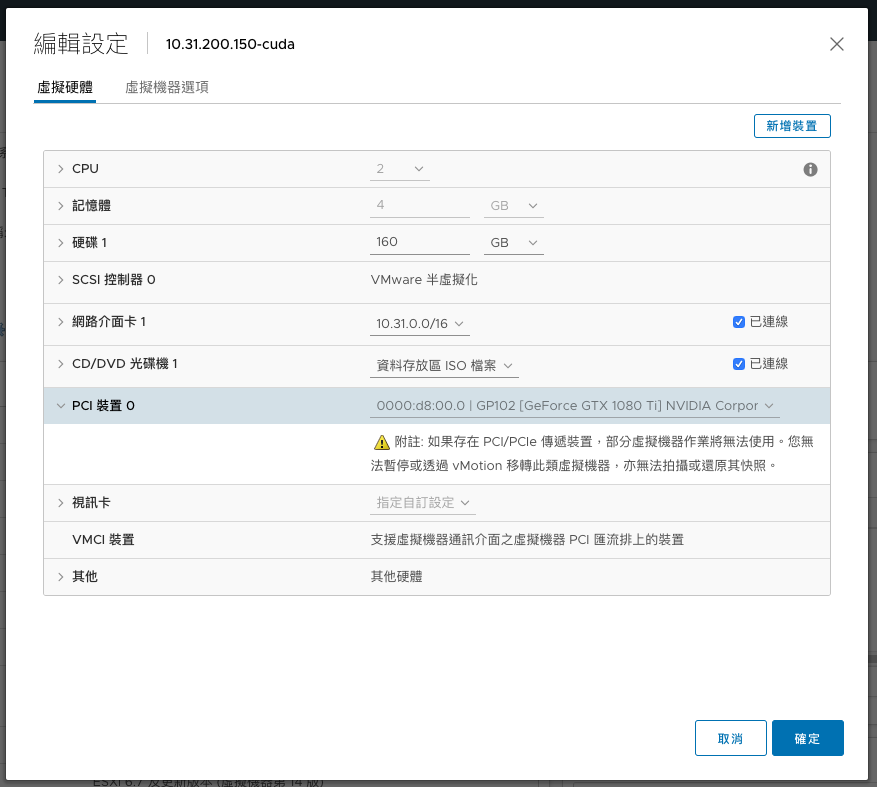
最後再進階設定中加入hypervisor.cpuid.v0=False之設定
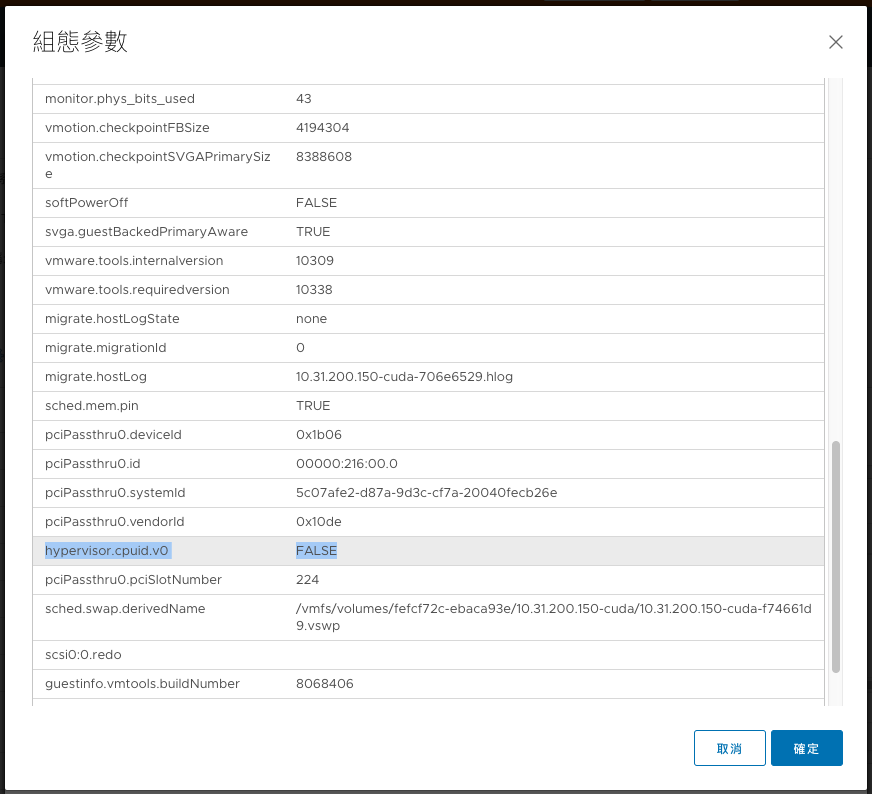
就可以在虛擬機內看到GPU了.
執行CUDA也可以正常.

如下:
#安裝必要套件
yum –y update
yum install kernel-devel kernel-headers gcc dkms acpid libglvnd-glx libglvnd-opengl libglvnd-devel pkgconfig pciutils gcc-c++ wget
yum groupinstall "Development Tools" -y
#Nvidia 硬體檢查
lspci | grep -E "VGA|3D"
#Blacklist nouveau
echo "blacklist nouveau" >> /etc/modprobe.d/nvidia-installer-disable-nouveau.conf && echo "options nouveau modeset=0" >> /etc/modprobe.d/nvidia-installer-disable-nouveau.conf
#regenerate the initramfs
dracut /boot/initramfs-$(uname -r).img $(uname -r) --force
reboot
wget http://tw.download.nvidia.com/XFree86/Linux-x86_64/410.78/NVIDIA-Linux-x86_64-410.78.run
bash NVIDIA-Linux-x86_64-410.78.run
#下載cuda
wget https://developer.nvidia.com/compute/cuda/10.0/Prod/local_installers/cuda_10.0.130_410.48_linux
mv cuda_10.0.130_410.48_linux cuda_10.0.130_410.48_linux.run
#安裝cuda
bash cuda_10.0.130_410.48_linux.run
export LD_LIBRARY_PATH=$LD_LIBRARY_PATH:/usr/local/cuda-10.0/lib64
export CUDA_HOME=/usr/local/cuda-10.0
export PATH=$PATH:/usr/local/cuda-10.0/bin
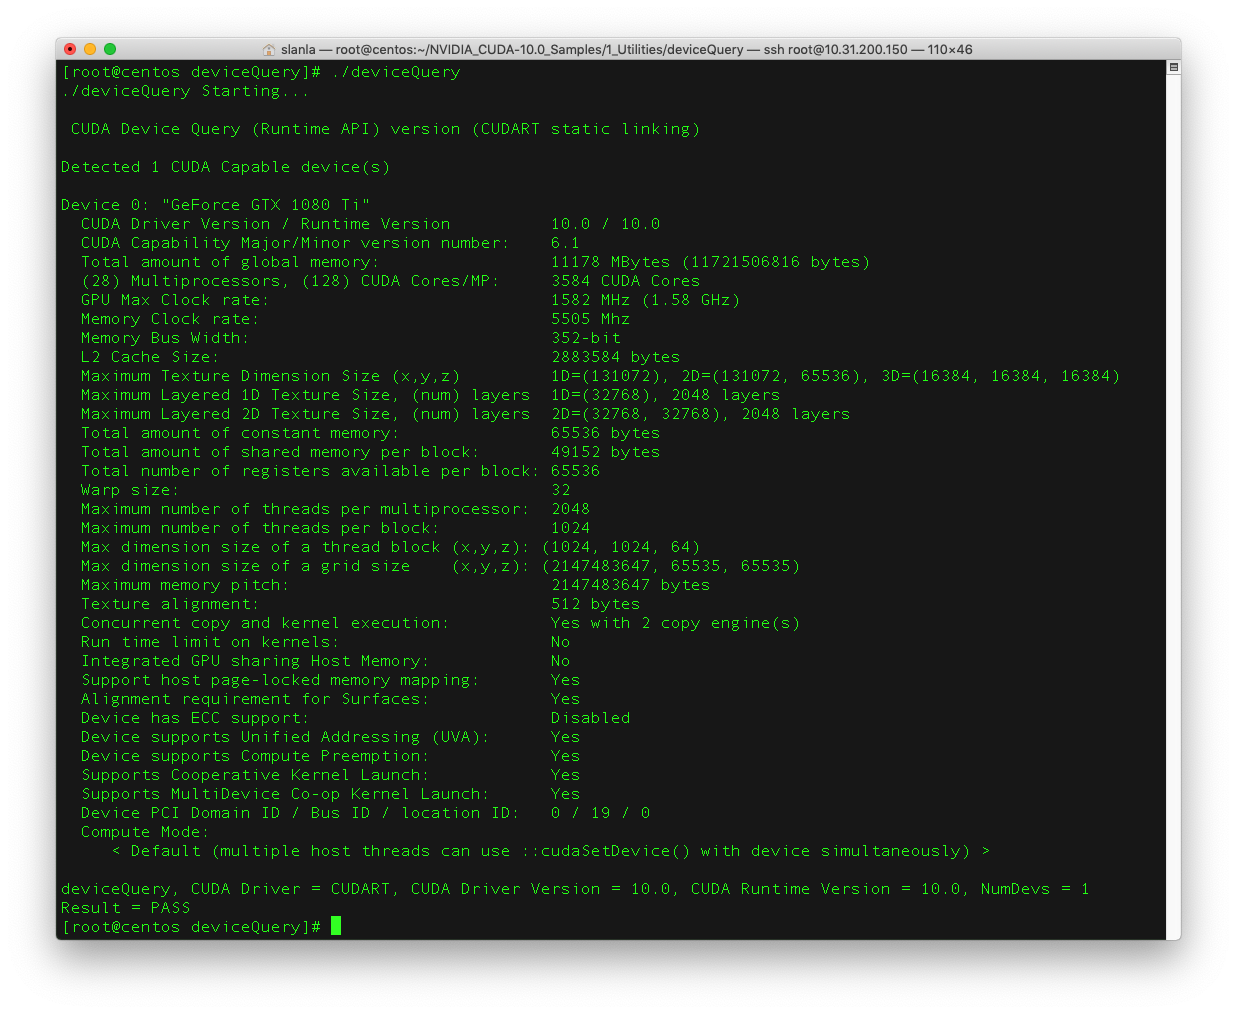
cd ~/NVIDIA_CUDA-10.0_Samples/1_Utilities/deviceQuery
make
./deviceQuery
cd ~/NVIDIA_CUDA-10.0_Samples/0_Simple/vectorAdd
make
./vectorAdd
刪除所有k8s上面的pod
kubectl get pods --all-namespaces -o wide | awk '{print $1 " " $2}' | while read AA BB; do kubectl delete pod --grace-period=0 --force -n $AA $BB; done
刪除所有k8s上面所有非Running的pod
kubectl get pods --all-namespaces -o wide | grep -v Running | awk '{print $1 " " $2}' | while read AA BB; do kubectl delete pod --grace-period=0 --force -n $AA $BB; done
使用如下指令,在fastestmirror.conf中,將.cn設定為exclude:
rm -r -f /var/cache/yum/timedhosts.txt
echo "exclude=.cn" >> /etc/yum/pluginconf.d/fastestmirror.conf
在維護模式下,以ssh進入主機後.
使用下列指令,進行升級.
esxcli software profile update --depot=/vmfs/volumes/[datastore]/update-from-esxi6.7-6.7_update01.zip -p ESXi-6.7.0-20181002001-standard
之後重開機既可.