DOMAIN=tgis.tw
date --date="$(echo | openssl s_client -showcerts -servername ${DOMAIN} -connect ${DOMAIN}:443 2>/dev/null | openssl x509 -inform pem -noout -enddate | awk -F '=' '{print $NF}' )" +%s分類彙整: 未分類
mysql 修改root密碼
修改root密碼
use mysql;
UPDATE user SET Password=PASSWORD("xxxxxxx") WHERE User='root';
flush privileges;word 打勾
常用打勾
P R O Q £
ssh 免密碼登入
產生公私鑰
mkdir -p ~/.ssh
cd ~/.ssh
ssh-keygen -f id_rsa -t rsa -N ''
將公鑰寫入server的authorized_keys
cat ~/.ssh/id_rsa.pub | ssh username@serverip "cat >> ~/.ssh/authorized_keys"地震預警的構想
筆記
1868年 Copper提出的地震預警的構想
San Francisco Daily Evening Bulletin of 3rd November 1868
Earthquake Indicator
EDITOR BULLETIN.
Since the Japanese magnet indicator has proved a failure, we are now obliged to look for some other means of prognosticating these fearful convulsions, and I wish to suggest the following mode by which we may make electricity the means, perhaps, of saving thousands of lives in case of the ccurrence of more severe shocks than we have yet experienced. It is well known that these shocks are produced by a wavemotion of the surface of the earth, the waves radiating from a center just as they do in water when a stone is thrown in. If this center happens to be far enough from this city, we may be easily notified of the coming wave in time for all to escape from dangerous buildings before it reaches us. The rate of velocity, as observed and recorded in Dr. J. B. Trask’s work on Earthquakes in California from 1800 to 1864, is 61.5 (six and one fifth) miles per minute, or a little less per hour (40 miles) than the tidal wave is reported to have traveled across the ocean to this port from the Sandwich Islands or Japan. A very simple mechanical contrivance can be arranged at various points from 10 to 100 miles from San Francisco, by which a wave of the earh high enough to do damage, will start an electric current over the wires now radiating from this city, and almost instantaneously ring an alarm bell, which should be hung in a high tower near the center of the city. This bell should be very large, of peculiar sound, and known to everybody as the earthquake bell. Of course nothing but the distant undulation of the surface of the earth should ring it. This machinery would be self-acting, and not dependent on the telegraph operators, who might not always retain presence of mind enough to telegraph at the moment, or might sound the alarm too often. As some shocks appear to come from the west, a cable might be laid to the Farallone Islands, 25 miles distant, and warnings thus given of any danger from that direction. Of course there might be shocks, the central force of which was too near this city to be thus protected, but that is not likely to occur once in a hundred times.
J.D. COOPER, M.D.
tensorflow 初測
#TAG=latest-py3
TAG=latest-gpu-py3

#準備資料
rm -rf $PWD/test
mkdir -p $PWD/test
cd $PWD/test
git clone https://github.com/purocean/tensorflow-simple-captcha.git
cd tensorflow-simple-captcha

#前處理
docker run \
  --runtime=nvidia \
  -it --rm \
  -v $PWD:/data \
  -w /data \
  tensorflow/tensorflow:$TAG python3 prepare.py

#訓練
time docker run \
  --runtime=nvidia \
  -it --rm \
  -v $PWD:/data \
  -w /data \
  tensorflow/tensorflow:$TAG python3 train.py

#測試
docker run \
  --runtime=nvidia \
  -it --rm \
  -v $PWD:/data \
  -w /data \
  tensorflow/tensorflow:$TAG bash -c 'python3 work.py < test.jpg'
用docker編譯latex文件
最近打開在寫技術報告,寫到一半覺得word弄出來的文件非常難看.
因此興起了用latex寫文件的念頭.
因為已經兩三年沒寫latex,連安裝基本上都沒有了.
稍微搜尋一下安裝方法,又分為MacOS/Windows.
想說太麻煩了!
乾脆用docker來跑latex編譯的工作.
下列就是用docker建立一個latex編譯環境:
1.首先我們需要建立一個image
mkdir -p $PWD/latex_temp/fonts
cat <<EOF > $PWD/latex_temp/Dockerfile
FROM slanla/ubuntu

MAINTAINER slanla [email protected]
RUN DEBIAN_FRONTEND=noninteractive \
    apt-get update && \
    apt-get upgrade -y && \
    apt-get -f install && \
    apt-get install -y \
      fontconfig \
      texlive-xetex \
      texlive-publishers \
      texlive-latex-extra \
      texlive-latex-recommended \
      latex-cjk-* \
      language-pack-zh-hant \
      language-pack-zh-hant-base

COPY fonts /usr/share/fonts
ENV LANG zh_TW.UTF-8
ENV LANGUAGE zh_TW:zh
ENV LC_ALL zh_TW.UTF-8
EOF

docker build -t slanla/latex $PWD/latex_temp/
2.接著之後有需要編譯*.tex文件的話,例如是main.tex,
只需要在main.tex所在目錄下執行下列指令就可以編譯出main.pdf.
docker rm -f latex || echo 1
docker run \
    -d \
    --name latex \
    -v $file_path:/data \
    -w /data \
    slanla/latex \
    xelatex main.tex
docker logs -f latex
這邊可以看到我是用-d,並加上docker logs來查看log,而非用-it –rm.主要避免latex出錯時,整個終端機會無法控制使用的問題.
3.有了步驟2的指令,我們就可以跟Sublime Text來做整合.
(a)首先打開Sublime Text
(b)開啟Tools->Build System->New Build System
(c)輸入下列json資料:
{
  "encoding": "utf8",
  "working_dir": "$file_path",
  "shell_cmd": "(rm -f $file_path/*.aux $file_path/*.bbl $file_path/*.blg $file_path/*.lof $file_path/*.log $file_path/*.toc) && (docker rm -f latex || echo 1 ) && docker run -d --name latex -v $file_path:/data -w /data dkr.tw/latex bash -c 'xelatex $file_base_name;bibtex $file_base_name;xelatex $file_base_name' && docker logs -f latex"
}
如此一來只需要用Sublime Text編輯main.tex後,按下CMD+B就可以編譯成PDF檔案了.
esxi 6.7上面安裝1080ti
今天在一台Dell R740上面安裝Dell製造的1080Ti
在esxi host上面開啟PCI透通後,重開機
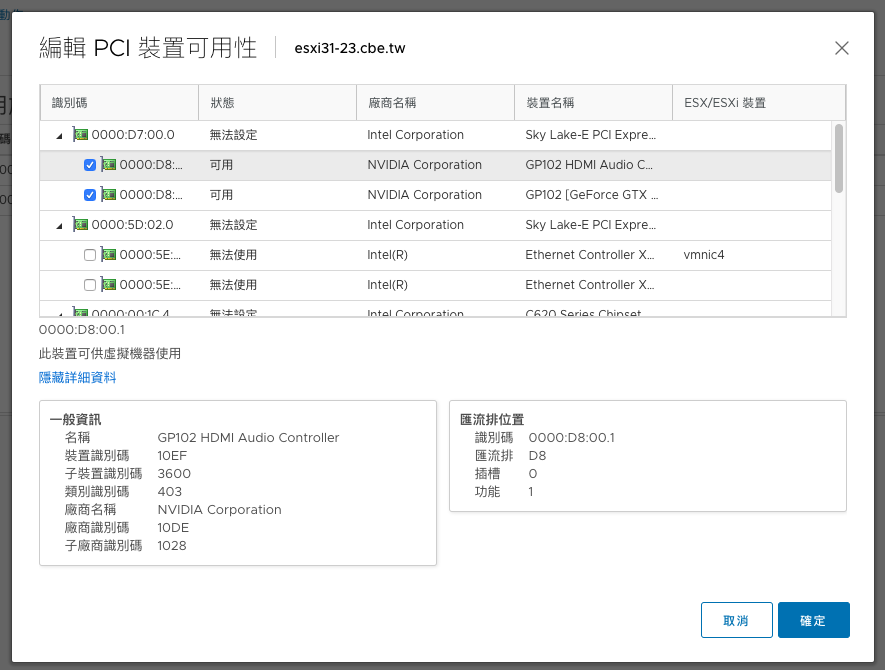
接著在虛擬機上面新增PCI裝置
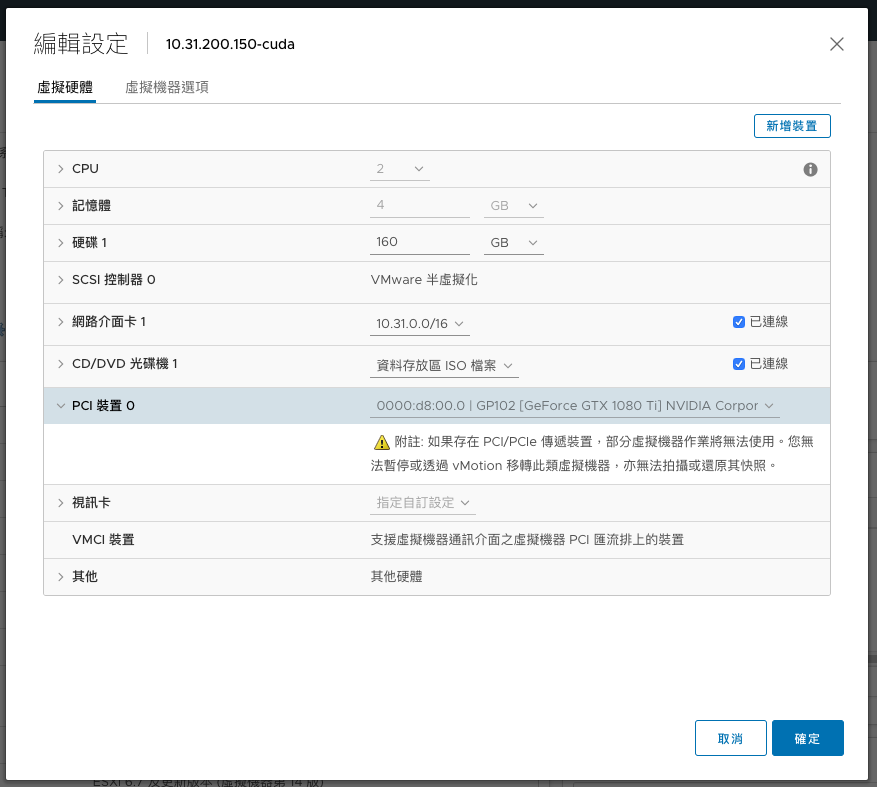
最後再進階設定中加入hypervisor.cpuid.v0=False之設定
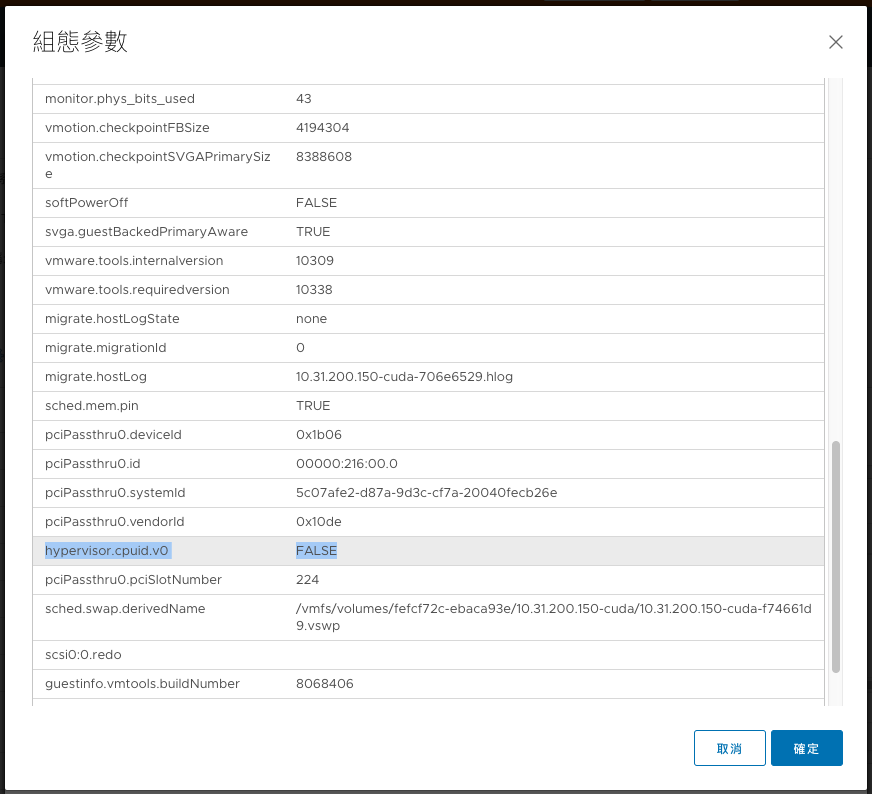
就可以在虛擬機內看到GPU了.
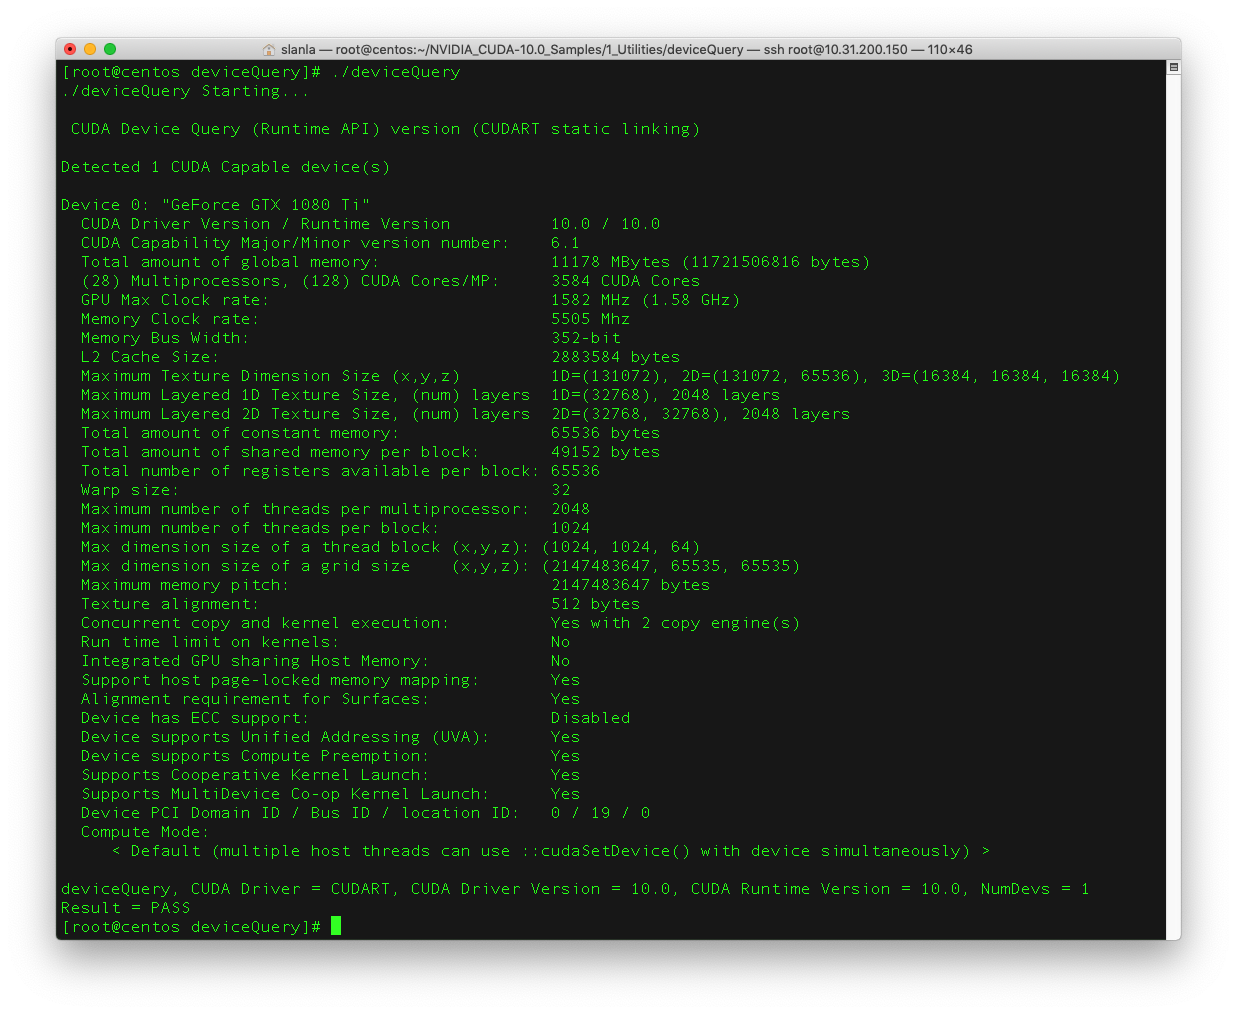
執行CUDA也可以正常.

使用Javascript產生細胞廣播告警聲響
使用Javascript Code:
<script>
  function play(music,time){
    //參考http://www.csie.ntnu.edu.tw/~u91029/Audio.html
    var sampleRate   = 10000;
    var sampleNumber = music[0].length*10000*time;
    var ctx    = new AudioContext();
    var buffer = ctx.createBuffer(2, sampleNumber, sampleRate);


    //製作聲音資料
    var data0   = buffer.getChannelData(0); //第1聲道
    var data1   = buffer.getChannelData(1); //第2聲道
    for (var i = 0; i < sampleNumber; ++i){
      var index=Math.floor(i/(sampleRate*time));
      data0[i] = Math.sin((Math.PI * 2) * i * music[0][index] / sampleRate);
      data1[i] = Math.sin((Math.PI * 2) * i * music[1][index] / sampleRate);
    }

    // 製作節點、串連節點、播放聲音
    var node    = ctx.createBufferSource();
    node.buffer = buffer;
    node.connect(ctx.destination);
    node.start(0);
  }

  var __=0;
  var S960=960;
  var S853=853;
  var music=[[
    S960,S960,S960,S960,  //2秒
    __,                   //停頓0.5sec
    S960,S960,            //1秒
    __,                   //停頓0.5秒
    S960,S960,            //1秒
    __,                   //停頓0.5秒
    S960,S960,S960,S960,  //2秒
    __,                   //停頓0.5sec
    S960,S960,            //1秒
    __,                   //停頓0.5秒
    S960,S960             //1秒
  ],[
    S853,S853,S853,S853,
    __,
    S853,S853,
    __,
    S853,S853,
    __,
    S853,S853,S853,S853,
    __,
    S853,S853,
    __,
    S853,S853
  ]];
  play(music,0.5);/**/
</script>
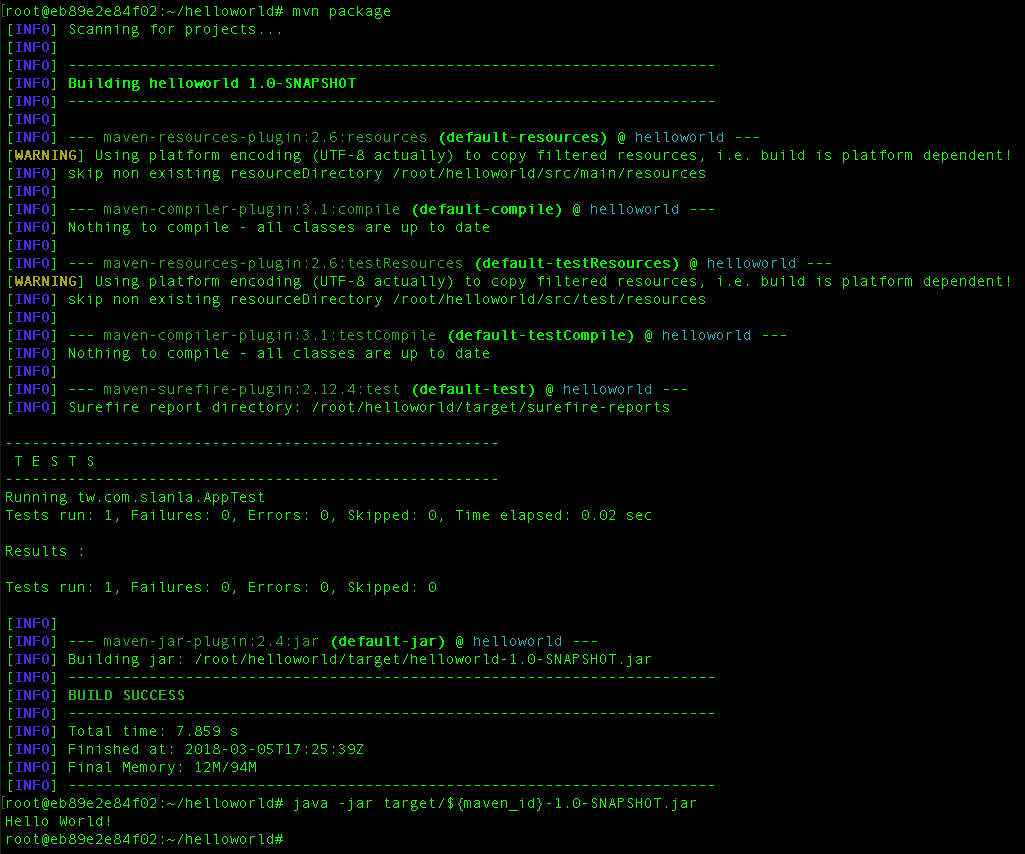
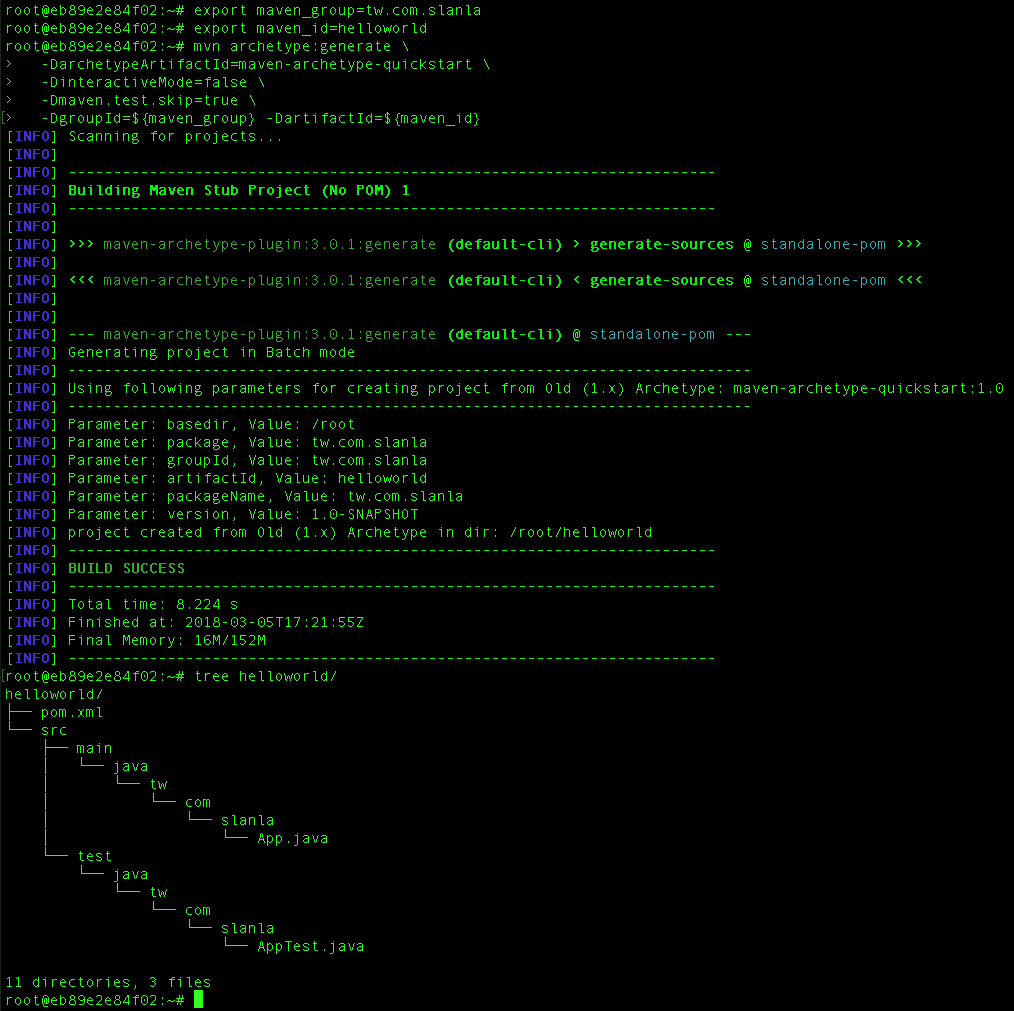
Apache Maven 初體驗
參考網址: http://www.codedata.com.tw/java/understanding-gradle-2-maven/hello-world/
1.建立專案
export maven_group=tw.com.slanla
export maven_id=helloworld
mvn archetype:generate \
  -DarchetypeArtifactId=maven-archetype-quickstart \
  -DinteractiveMode=false \
  -Dmaven.test.skip=true \
  -DgroupId=${maven_group} -DartifactId=${maven_id}
2.編譯專案
cd $maven_id
mvn package
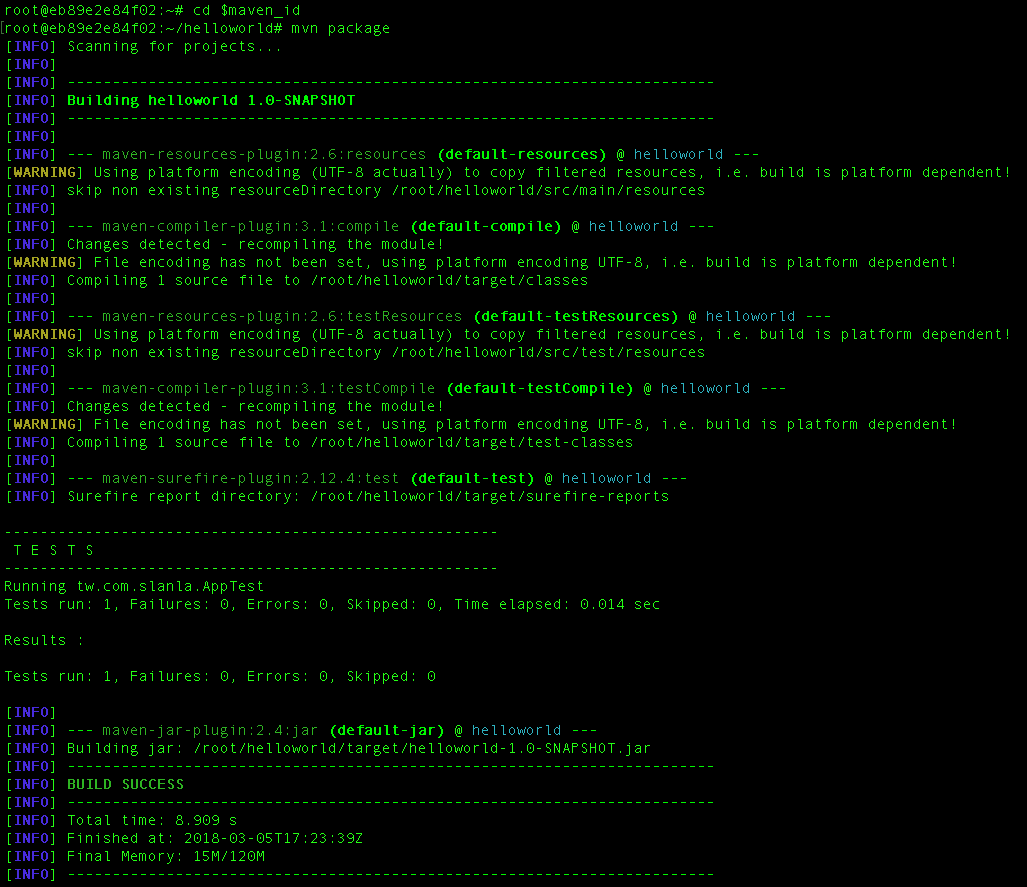
3.執行程式
java -cp target/${maven_id}-1.0-SNAPSHOT.jar ${maven_group}.App

如果不想要每次執行jar時,還要指定mainclass的話,
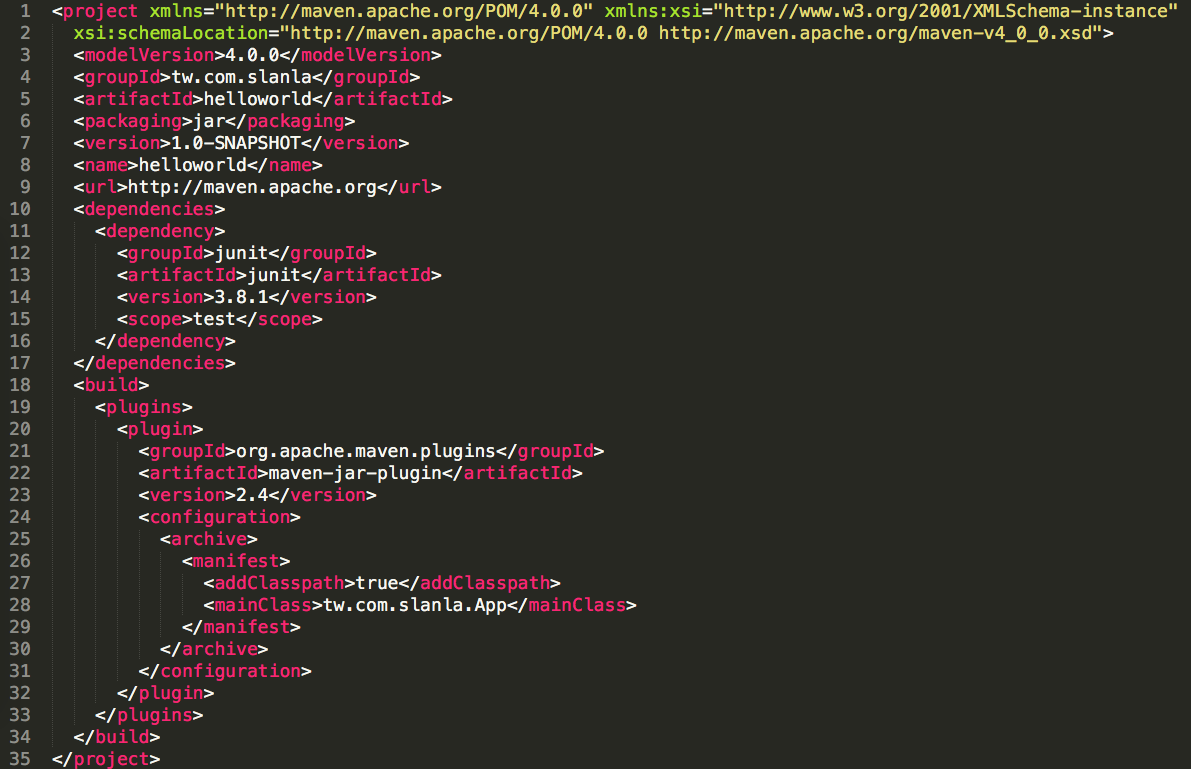
可以在pom.xml中加入
<build>
  <plugins>
    <plugin>
      <groupId>org.apache.maven.plugins</groupId>
      <artifactId>maven-jar-plugin</artifactId>
      <version>2.4</version>
      <configuration>
        <archive>
          <manifest>
            <addClasspath>true</addClasspath>
            <mainClass>tw.com.slanla.App</mainClass>
          </manifest>
        </archive>
      </configuration>
    </plugin>
  </plugins>
</build>
如下圖所示:
這樣一來就可以用java -jar直接執行:
java -jar target/${maven_id}-1.0-SNAPSHOT.jar