壓縮path:
tar zcvf output.tar.gz path

# 使用變數
D=dir1 && tar zcvf ${D}.tar.gz ${D}
解壓縮目前的資料夾:
tar zxvf input.tar.gz
壓縮path:
tar zcvf output.tar.gz path
# 使用變數
D=dir1 && tar zcvf ${D}.tar.gz ${D}解壓縮目前的資料夾:
tar zxvf input.tar.gz使用brew安裝
brew install pkg-config sdl2 sdl2_image sdl2_ttf sdl2_mixer gstreamer
sudo easy_install pip
sudo pip install Cython==0.26.1
pip install --user --verbose https://github.com/kivy/kivy/zipball/master
參考網址:
https://kivy.org/docs/installation/installation-osx.html
https://github.com/kivy/kivy/issues/5473#issuecomment-342073144
目前 raspberry pi 2017-11-29-raspbian-stretch 跟 docker 17.11.0會出現 cgroups: memory cgroup not supported on this system 之錯誤
所以暫時解決的辦法是將docker降到17.09.0
sudo apt-get remove -y docker-ce
sudo apt install -y docker-ce=17.09.0~ce-0~raspbian
sudo apt-mark hold docker-ce
等之後問題解決了就可以用下列指令解鎖,並升級
sudo apt-mark unhold docker-ce
sudo apt-get upgrade -y
在raspberry pi上安裝好NOOBS,
可透過下列指令直接安裝docker(ps: sudo預設也不需要密碼)
curl -sSL https://get.docker.com | sh
接著將pi使用者加入docker群組
可透過下列指令直接安裝docker(ps: sudo預設也不需要密碼)
sudo usermod -aG docker pi
最後重新登入就可以用docker了
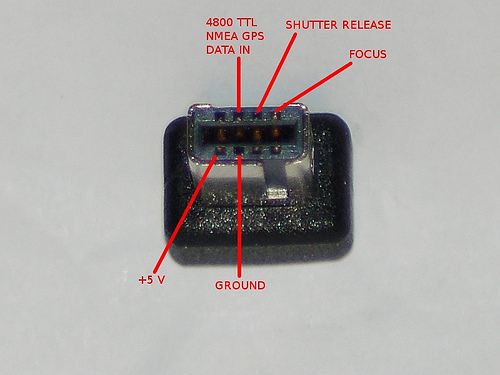
快門線腳位
pin1是7V電源
pin2是GND
pin6是GPS訊號(UART之RX)
pin7與pin8以及pin2短路時是照相
pin8與pin2短路時是對焦

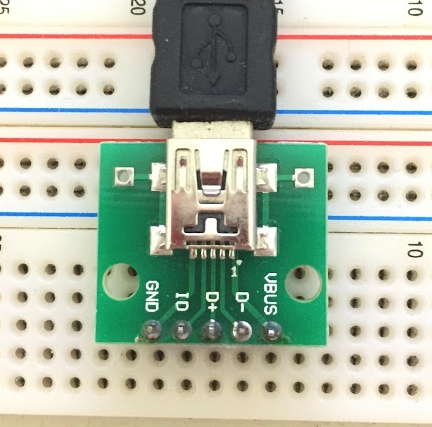
轉換到mini usb後對應的腳位
VBus是7V
GND是接地
D-是GPS訊號(UART之RX)
D+與IO以及GND短路時是照相
ID與GND短路時是對焦

安裝chrome, refer
sudo bash -c ‘cat <<EOF > /etc/yum.repos.d/google-chrome.repo
[google-chrome]
name=google-chrome
baseurl=http://dl.google.com/linux/chrome/rpm/stable/$basearch
enabled=1
gpgcheck=1
gpgkey=https://dl-ssl.google.com/linux/linux_signing_key.pub
EOF

sudo yum -y install google-chrome-stable
安裝qt5, refer
sudo yum -y install gcc gcc-c++ mesa-libGL-devel mesa-libGLU-devel freeglut-devel
wget http://download.qt.io/archive/qt/5.4/5.4.2/qt-opensource-linux-x64-5.4.2.run
chmod +x qt-opensource-linux-x64-5.4.2.run
sudo ./qt-opensource-linux-x64-5.4.2.run
安裝proj4, refer
sudo yum install epel-release -y
sudo yum install -y proj proj-devel proj-epsg
我自建的gitlab是跑在synology上,不過因為效能太差了
因此決定將gitlab移植到vm上.
之前測試了讓vm掛載synology網芳的gitlab data的資料夾,
但是都會發生權限的問題.
因此目前打算讓gitlab data的資料夾也放在vm的本機端.
再透過定期備份的方式,來保全資料.
以下是我移機的紀錄
備份
[code lang=”bash”]docker exec -it gitlab gitlab-rake gitlab:backup:create[/code]
還原-前置工作
建立資料夾
[code lang=”bash”]mkdir -p $PWD/files/data/backups
mkdir -p $PWD/files/conf
mkdir -p $PWD/files/log/[/code]
複製備份資料
[code lang=”bash”]cp $OLD_GITLAB_PATH/backups/1510018625_2017_11_07_10.1.0_gitlab_backup.tar $PWD/files/data/backups[/code]
執行新的gitlab
[code lang=”bash”]docker run -d \
–name=gitlab \
–publish 443:443 \
–publish 80:80 \
–restart always \
-v $PWD/files/conf:/etc/gitlab \
-v $PWD/files/log:/var/log/gitlab \
-v $PWD/files/data:/var/opt/gitlab \
gitlab/gitlab-ce:10.1.0-ce.0[/code]
等待兩三分鐘後,確定可以進入gitlab web ui介面後
開始進入還原工作
還原
進入container
[code lang=”bash”]docker exec -it gitlab bash[/code]
停止服務
[code lang=”bash”]gitlab-ctl stop unicorn
gitlab-ctl stop sidekiq[/code]
設定權限
[code lang=”bash”]chmod 777 /var/opt/gitlab/backups/1510018625_2017_11_07_10.1.0_gitlab_backup.tar[/code]
還原
[code lang=”bash”]gitlab-rake gitlab:backup:restore BACKUP=1510018625_2017_11_07_10.1.0[/code]
重啟服務
[code lang=”bash”]gitlab-ctl restart[/code]
check
[code lang=”bash”]gitlab-rake gitlab:check SANITIZE=true[/code]
wget https://developer.nvidia.com/compute/cuda/9.0/Prod/local_installers/cuda-repo-ubuntu1604-9-0-local_9.0.176-1_amd64-deb
sudo service lightdm stop
sudo dpkg -i cuda-repo-ubuntu1604-9-0-local_9.0.176-1_amd64-deb
sudo apt-key add /var/cuda-repo-9-0-local/7fa2af80.pub
sudo apt-get update && sudo apt-get install cuda -y
sudo reboot
sudo ln -s /usr/local/cuda/bin/nvcc /usr/bin/nvcc
編輯.bashrc
vim ~/.bashrc
加入
export LD_LIBRARY_PATH=$LD_LIBRARY_PATH:/usr/local/cuda/lib64:/usr/local/cuda/extras/CUPTI/lib64:/usr/lib/nvidia-367
export CUDA_HOME=/usr/local/cuda
export PATH=$PATH:/usr/local/cuda/bin
cd /usr/local/cuda/samples/0_Simple/vectorAdd
make
./vectorAdd
建立測試檔案vectorAdd.cu
#include <stdio.h>
#include <cuda_runtime.h>

__global__ void vectorAdd(const float *A, const float *B, float *C, int numElements){
  int i = blockDim.x * blockIdx.x + threadIdx.x;
  if (i < numElements){
    C[i] = A[i] + B[i];
  }
}

int main(void){
  int numElements = 50000;

  //初始化測試資料
  float *h_A=new float[numElements];
  float *h_B=new float[numElements];
  float *h_C=new float[numElements];
  for (int i = 0; i < numElements; ++i) {
    h_A[i] = rand()/(float)RAND_MAX;
    h_B[i] = rand()/(float)RAND_MAX;
  }

  //配置GPU記憶體空間,並從記憶體中複製資料至GPU中
  size_t size = numElements * sizeof(float);
  float *d_A = NULL; cudaMalloc((void **)&d_A, size);
  float *d_B = NULL; cudaMalloc((void **)&d_B, size);
  float *d_C = NULL; cudaMalloc((void **)&d_C, size);
  cudaMemcpy(d_A, h_A, size, cudaMemcpyHostToDevice);
  cudaMemcpy(d_B, h_B, size, cudaMemcpyHostToDevice);

  //運算
  int threadsPerBlock = 256;
  int blocksPerGrid =(numElements + threadsPerBlock – 1) / threadsPerBlock;
  vectorAdd<<<blocksPerGrid, threadsPerBlock>>>(d_A, d_B, d_C, numElements);

  //取回運算結果
  cudaMemcpy(h_C, d_C, size, cudaMemcpyDeviceToHost);

  //清除GPU記憶體空間
  cudaFree(d_A);
  cudaFree(d_B);
  cudaFree(d_C);

  //驗證資料
  for (int i = 0; i < numElements; ++i) {
    if (fabs(h_A[i] + h_B[i] – h_C[i]) > 1e-5) {
      fprintf(stderr, "Result verification failed at element %d!\n", i);
      exit(EXIT_FAILURE);
    }
  }

  //清除記憶體
  delete d_A;
  delete d_B;
  delete d_C;

  printf("Test PASSED\n");
  return 0;
}
接著手動編譯~
/usr/local/cuda-9.0/bin/nvcc \
  -ccbin g++  \
  -m64 \
  -gencode arch=compute_30,code=sm_30 \
  -gencode arch=compute_35,code=sm_35 \
  -gencode arch=compute_37,code=sm_37 \
  -gencode arch=compute_50,code=sm_50 \
  -gencode arch=compute_52,code=sm_52 \
  -gencode arch=compute_60,code=sm_60 \
  -gencode arch=compute_70,code=sm_70 \
  -gencode arch=compute_70,code=compute_70 \
  -c vectorAdd.cu -o vectorAdd.o

/usr/local/cuda-9.0/bin/nvcc \
  -ccbin g++ \
  -m64 \
  -gencode arch=compute_30,code=sm_30 \
  -gencode arch=compute_35,code=sm_35 \
  -gencode arch=compute_37,code=sm_37 \
  -gencode arch=compute_50,code=sm_50 \
  -gencode arch=compute_52,code=sm_52 \
  -gencode arch=compute_60,code=sm_60 \
  -gencode arch=compute_70,code=sm_70 \
  -gencode arch=compute_70,code=compute_70 \
  vectorAdd.o -o vectorAdd
筆記一下:
nvidia-docker run -it --rm \
  nvidia/cuda \
  bash
等同於:
docker run -it --rm \
  --device=/dev/nvidiactl \
  --device=/dev/nvidia-uvm \
  --device=/dev/nvidia0 \
  nvidia/cuda \
    bash
首先在終端機中啟動XQuartz,並設定好socat
#取得IP
IP=$(ipconfig getifaddr en0)
#設定X11
open -a XQuartz &
nohup socat TCP-LISTEN:6000,reuseaddr,fork UNIX-CLIENT:\"$DISPLAY\" >/dev/null 2>&1 &
接著在終端機內執行下列指令,就可以啟一個QGIS.
#執行qgis container
docker run -it --rm \
  -e DISPLAY=$IP:0 \
  --volume="$HOME/.Xauthority:/root/.Xauthority:rw" \
  -v /tmp/.X11-unix:/tmp/.X11-unix \
  -v $PWD:/data \
  -w /data \
  slanla/qgis:latest
注意,此指令會將目前所在資料夾($PWD),掛載到container內的/data